If you have a flooring section that has begun to sag you should install a few noggins. Supporting and partitioning the floors and walls of the structure you are building is critically important. These are done with shims and other bits of wood, called noggins, that make the form solid and sturdy.
Do you need noggins in floor joists? You need noggins in floor joists. When constructing floors placing noggins will aid with additional weight and leveling issues.
The rules surrounding when and where to place these noggins could be an issue, but don’t let that stop you! Dive into the article below and find out just what you need to make the floor level and safe.
How to Use a Noggin
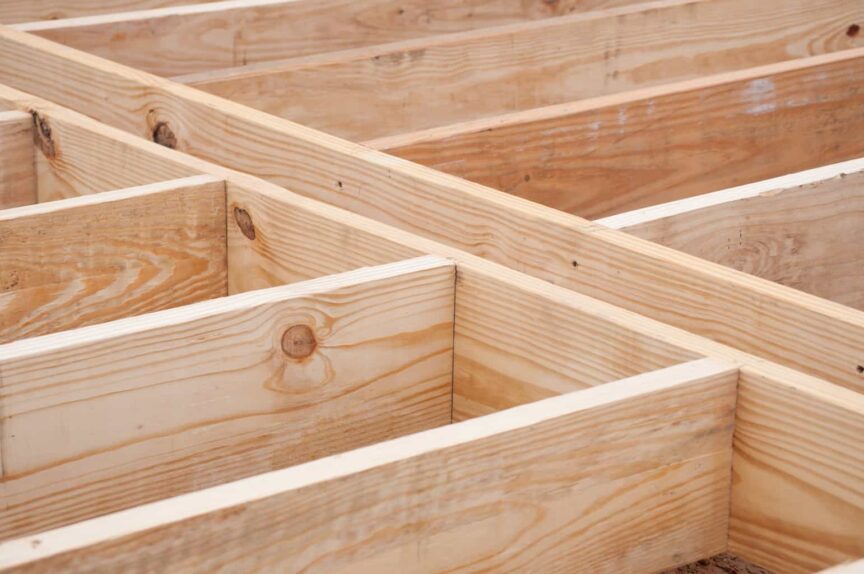
A noggin in construction is the term used for pieces of wood that are nailed between the main floor joists for support. They help to straighten the studs and make the structure stable. Buildings built from a kit, like a garden shed, will have instructions that will tell you exactly how to place the noggins.
By reinforcing the 2×6, or whatever size you chose for the joists, you make the rectangle shape stronger. Whatever the purpose of the floor is, one thing is for sure that it will need to be able to support the weight. Think about each room as you are building, and keep in mind each one will have to be filled with equipment or personnel that needs to be protected.
Taking pieces of 2×6 and cutting them to fit between the existing joists makes the boards able to support weight in heavy loads and not warp. Noggins also spread the weight out to surrounding pieces to provide years of stability. An adequately built structure requires all the other pieces to play a part in supporting the larger whole.
How Far Apart Should Noggins Be?
Think of noggins as another way to reinforce the floors where they intersect with walls or at critical points to create stability. These should be fit for the exact measurement of the area and need to be nailed in place. Their edges should be flush with each other. If you have a high edge, it will make your floor have a tiny rise that could ruin the entire structure.
When deciding where to place them, it should be halfway between the wall and the joist’s end. Think of a piece of lumber like a string. When you add weight to the string if there is nothing to support the weight from underneath it will crumble. All the weight, no matter where it started on the line, will head towards the center.
The noggin’s job is to rest between these lines and others supporting it. Once the piece is nailed home, it will be able to support much more weight and support other joists as well. There are several different ways to place the noggins, but going with the traditional is the easiest. A herringbone design, one that reinforces at angles instead of straight ahead, is seen in newer and custom made homes.
How To Build a Floor
Joists can be laid out in a pattern and covered with plywood to create the standard flooring that we see every day. A few measurements can put you on the path to a new escape or outbuilding to follow your hobby. Building the escape that you need will take lots of time and tools. Be prepared to reach into your wallet if you require the help of a professional. It seems like a cut and dried process, but there are more steps involved than you would think. The steps to build a floor are:
- Foundation Work
- Pick the Lumber
- Make a Square
- Labor the Layout
- Attach the pieces
- Placing Noggins
- Sheeting the Floor
1. Foundation work
When it comes to building a home, having a solid foundation should be the first thing on your list. Without a firm unbroken foundation, the building is doomed. Take the time and fix all cracks and imperfections in the concrete. This job could mean hours of mix and laying new concrete or just a filler spray to firm up the base. Also, the foundation needs to be square. A few measurements with a level should tell you what section needs to be flush. If the base isn’t secure, you can look forward to a lifetime of problems out of your building.
2. Pick the lumber
When it comes to selecting wood for the floor, you should stick to 2×6 and above. If you are building a deck for your lawnmower when it isn’t in service, you could probably get by on 2×4. Anything smaller than a 2×6 will not support the kind of weight that goes into a dwelling. Another thing to look for is knots and imperfections. If there is a knot close to the edge, it could have to be removed, which would weaken the whole board’s integrity.
3. Make a Square
When it comes to building something sturdy and can withstand the test of time, it must be square before moving forward. You might think that having four equal corners would make the structure square, but we are dealing with the level. Once you have measured the square, use a level to determine if every corner is at the same height. A significant problem associated with uneven bases is sloping roofs and gaps in walls and floors.
4. Labor the Layout
Now that the structure is square and level, you can begin to mock up the joists by measuring. The standard measurement for joists is 12 to 16 inches, depending on the structure. With more substantial sections of lumber, 2 x 10 and above, you can expect a 16-inch spacing, as they can support more weight from above. This part will mean moving all the pieces of lumber by hand. These pieces could weigh over 500 lbs and require several people, or a machine, to get them moved into place.
5. Attach the Pieces
There are some nifty pieces of metal called joist hangers that will need to be attached to the areas that you measured. These hangers are made to seat the joists while reinforcing the joint with bits of metal and screws. There will be several of these that run the length of the beams on each opposing end. Take the time to make sure that they are all flush.
6. Placing the Noggins
When it comes to spacing the potential spots for noggins, you should half each joist. That means you should place one at the halfway point of each 2×6 used as joists. Placing these in the weakest spots will keep the floors inside level and allow you to place appliances and furniture inside. If you know the room needs extra support, like in the bathroom and kitchen, it is fine to add additional noggins.
7. Sheeting the Floor
Once the noggins and other supporting pieces are in place, you can begin to throw down the plywood. 3/4 inch plywood is a standard that can be amended to whatever purpose you need. For instance, if you are building a weight room in your home, you would need to use more dense lumber to keep the floor from collapsing under the excess weight. The sheets should be nailed into the joists with a nail every 12 inches should secure them. Again, if you plan on heavy traffic or excess weight in the room, you should build accordingly.
Share this Post
Giovanni Valle is a licensed architect and LEED-accredited professional and is certified by the National Council of Architectural Registration Boards (NCARB). He is the author and managing editor of various digital publications, including BuilderSpace, Your Own Architect, and Interiors Place.