Affiliate Disclaimer: Some of the links below are affiliate links. As an Amazon Associate, I earn from qualifying purchases.
Stucco is used on interior or exterior walls in many homes, and it’s very popular (especially in southwestern states) due to its energy efficiency, low maintenance, and durability. However, there may be times when you are looking to change the aesthetic of your home exterior.
Adding siding to your stucco house can give it a fresh, updated look, and is available in various colors and styles to suit your preferences. Additionally, siding is typically easier to maintain than stucco, as it can be easily cleaned and repainted.
It is important to note, however, that installing siding over stucco may be more complex and time-consuming than installing siding on a wall with a different exterior finish, such as wood or brick. This article will give a step-by-step DIY guide to adding siding to your stucco house.
Installing the Siding
To add siding to your stucco house, prepare the wall by repairing any damage, such as cracks, and install furring strips to protect the wall from cracking when you hammer nails into it. Then, install insulation (for energy efficiency) and siding before painting it to achieve your desired look.
1. Gather Your Tools
Having the proper tools is the first step to successfully adding siding to your stucco house. You’ll need some tools and materials to complete this project. These include:
- Marker
- Tape measure
- Nail gun
- 2 x 3 inch (5.08 x 7.63 cm) furring strips
- Circular saw with a fine blade
- J-channel
- Hammer
- Snips
- Chalk line
- Roofing nails
- Wooden screws
- Metal siding starter strip
- Vinyl siding strips
- Siding corner posts
- Level
- Wire mesh
- Razor knife
- Zip tool
- Goggles
- Work gloves
2. Prepare the Exterior Wall
Now that you have all the necessary tools and materials, it’s time to begin preparing the exterior wall. Assess and repair any cracks, holes, or moisture damage:
- Cover surrounding grass and plants with a tarp to protect them from falling debris.
- Scrape crumbling or loose stucco pieces from the cracks and holes.
- Patch holes and seal cracks.
- Repair any moisture damage. Moisture must be sealed out. Sealing it in will allow it to seep further into the house and cause more severe damage.
How To Repair Cracks and Holes in Stucco
Putting siding over stucco with cracks or holes will cover the imperfections, but it doesn’t mean that the stucco won’t still have issues. Cracks cause significant energy leakage and affect the overall integrity of the stucco wall. Crumbling pieces from holes will keep falling between the stucco and the new siding.
The most important thing to do is to keep moisture out of the wall. Therefore, it’s essential that you fill, seal, and paint the cracks. Otherwise, the possibility of mold or mildew forming is very high. Additionally, filling up cracks and patching holes will give you a smooth, durable installation.
For minor cracks and holes, consider purchasing stucco patches or caulk to fix the damaged areas. Any crack less than 1/8-inch (3 mm) is small enough for you to repair. The best way to determine this is to insert a credit card to check the crack’s size. If it fits, the gap is too big.
The patch can be a different pattern from the wall because the siding will hide the differences. I recommend buying an elastomeric caulk (a type of caulk containing aluminum that expands and contracts with weather changes) such as the MorFlexx Mortar/Stucco Repair Caulk (available on Amazon.com). It’s easy to use, seals out moisture and works perfectly on vertical surfaces.
For more significant issues like foundation setting big cracks, get professional advice. Alternatively, remove the stucco and start over, especially if you suspect wood damage. It’s best to deal with all the problems before installing the new siding.
3. Install Furring Strips
Furring strips are narrow wooden strips used for siding. Their primary role is to ensure that your siding is stable, durable, and protective. Here’s how to install furring strips:
- Mark the furring strip mounting points along the length of the exterior stucco wall using a tape measure. Stretch your tape measure along the wall’s base, and mark points 16 inches (40.6 cm) apart. Stucco exterior walls have sheathing underneath, so locating studs to anchor the furring strips is unnecessary.
- Place a 2-3-inch (5-7.6 cm) wooden strip vertically at each mark and check using a level to ensure it’s straight. Fasten the strips to the wall upwards from the bottom. The 16-inch (40.6 cm) spacing provides ample support for the siding and maintains a manageable number of furring strips.
- Cut 2-3-inch (5-7.6 cm) furring strips and fix them around door and window openings and all corner edges. Measure and record the length of every window frame edge. Cut J-channel strips to fit around the frame, and snip the tip of each strip at a 45-degree angle.
- Use a hammer and roofing nails to attach the channel over the furring strips. Leave space between the channel and the nail head to allow the siding to expand and contract with weather changes. Do the same when installing channel strips or siding to the wall.
- Place the first starter strip at 4 inches (10 cm) up from the bottom of the wall. Draw a chalk line starting from the lowest corner and check with your level to ensure it’s straight. Attach this first strip to the other furring strips on the wall using nails and a hammer.
- Place siding corner posts on the furring strips on the edge of each wall corner and fasten them using a hammer and roofing nails. The posts should be approximately 1/4-inch (0.6 cm) short on each end to allow them to expand. The bars will overlap and conceal unpleasant details at the end of your siding.
Additionally, it’s essential that you take note of the following:
- Look for furring strips made from treated wood that can’t be damaged by wetness, as stucco can absorb moisture.
- Stucco is too fragile and hard to hammer nails in without the risk of cracks, so it’s best to use a nail gun or hammer drill. Additionally, concrete screws are the best option.
- It’s best to predrill holes on the furring strips at 8-inch (20 cm) intervals.
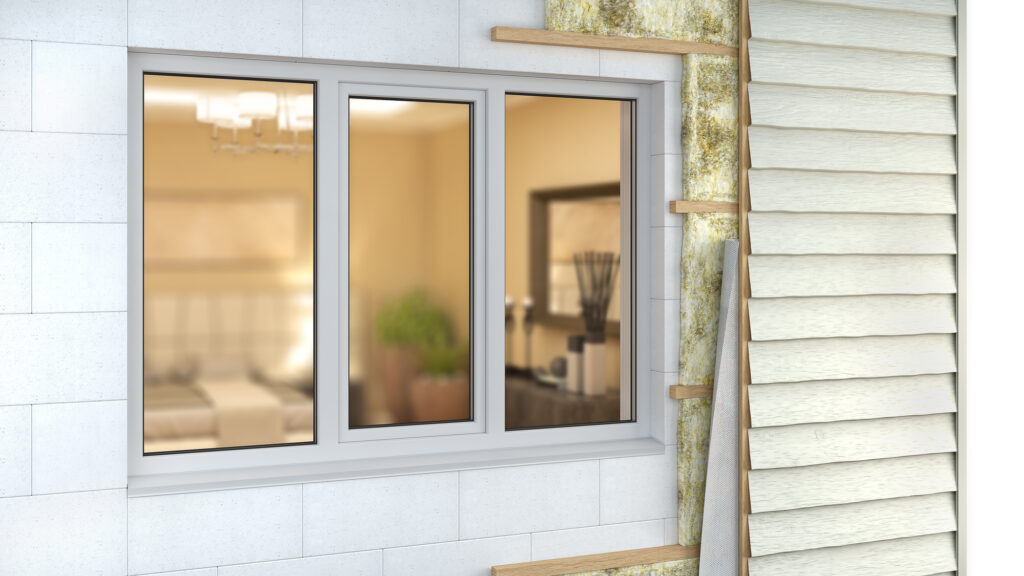
4. Install Insulation
Now that all your furring strips are in place, the next thing is to install insulation.
Some people skip the insulation and go straight to installing the siding. However, I recommend you insulate your walls to make your home energy efficient. Insulation will not only reduce your energy costs, but it’ll also protect your home from the elements.
Insulation is most effective if you choose R19 or higher, and it’s especially beneficial for stucco homes since they have little insulation.
To ensure the surface is flat for siding, it’s best to use insulation that’s slightly less thick than the furring strips. However, you should be fine as long as it’s not thicker. A 2 x 4-inch (5 x 10 cm) piece of wood is 1½ x 3½ inches (3.8 x 8.9 cm). Your insulation board should be 1½ inches (3.8 cm) thick or slightly thinner.
Additionally, it’s best to install a foam insulation board on top of the stucco to give the new siding a surface to lay on:
- Add a thin water barrier.
- Cut the insulation board to fit between the furring strips. It should be tight and secure.
- Glue the insulation board in place with an adhesive. It’s essential that the adhesive be made explicitly for stucco.
The water barrier is a permeable, waterproof membrane that provides the following:
- Moisture transmission: It allows moisture to escape.
- Water protection: It prevents external moisture from getting into the house.
- Air protection: It protects your home’s conditioned air, making it more energy efficient and lowering energy costs.
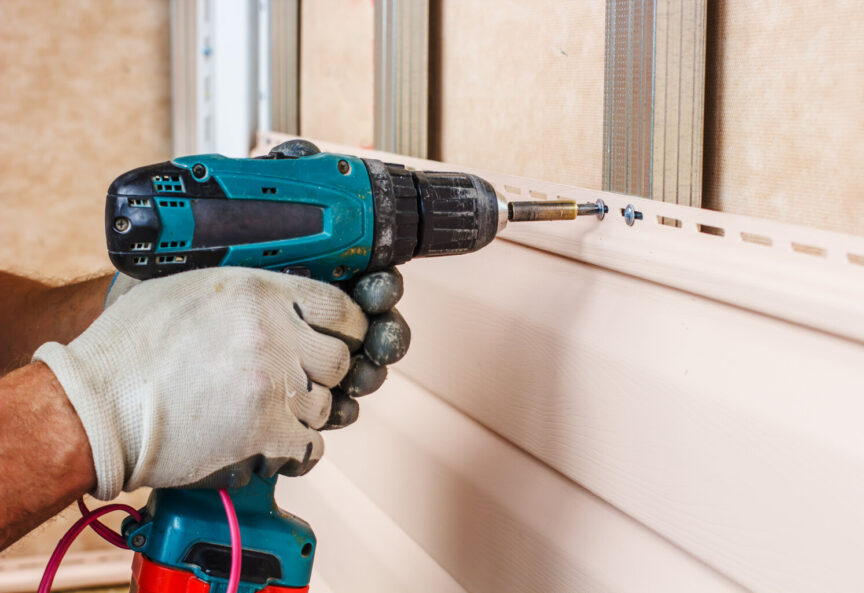
5. Install the Siding
After the insulation dries, you can install your siding. Follow these steps:
- Secure the window, door, and corner trim to the furring strips with wood screws that are 1/2-inch (3.8 cm) or 3/4-inch (4 cm).
- Use a chalk line to mark around corners and along the walls to ensure you install your panels straight and level.
- Start the siding installation from the bottom, and flush with the bottom sill plate. Nail the panel at 16-inch (40.6 cm) intervals to the furring strips, but not too tight to allow for weather-induced structural changes. Leave 1/16-inch (0.2 cm) between the siding and the nail head for the material to contract and expand without getting damaged.
- Place the end of each siding panel next to the edges of the wall, door frames, and window frames. Measure each siding piece to ensure it’s the right fit and does not leave excessive gaps. Cut pieces to fit around the windows, doors, and pipes.
- Add the second siding panel above the first one. Lock its bottom edge with the top of the first panel. Use a level to ensure the row is in a straight, horizontal line before proceeding to the next one.
- Repeat the process with all other panels until you reach the top.
- Snip the top edge of the siding strips with a razor knife to fit inside the J-channel at the bottom of the window frame. Cut siding strips to fit around door and window openings and hold them in place around the frame with nails. For the top of door and window frames, attach a siding strip to the one above it and install them together for extra stability.
- Use staples or finishing nails along the trim and around doors, windows, and other sections that require extra coverage. The trim should conceal the ends and edges of the siding panels.
- Use caulk with silicone sealant around exterior doors, windows, and other areas prone to water damage to keep moisture out. You can also apply it on cracks that you find on the stucco after installation to prevent them from worsening due to water damage.
Here are some things to consider when nailing:
- Keep the nails at the 16-inch (40.6 cm) intervals of the furring strips. Avoid nailing other visible parts of the panels because it will ruin the aesthetics of your siding.
- Nail snugly to prevent your siding from buckling due to temperature changes.
- Drive the nails straight, level, and in the center of the slots to allow the siding to contract and expand.
6. Paint the Siding
Once you complete installing your siding, your house is ready for painting. However, there are things you must do before you paint your new siding:
- Check whether the painting will affect the warranty of your siding material. If the warranty allows painting, consult the manufacturer on the paint to use.
- Choose an exterior water-based or oil-based paint to complete the look.
- Ask about any special sealants necessary if you use stucco paint or a primer on top.
- Use light colors for vinyl siding. Dark colors absorb more heat than vinyl siding cannot handle, so painting your vinyl in a darker color might cause the siding to warp and buckle.
Tips To Consider When Choosing a Color for a New Vinyl Siding
- Consider where you’re installing the new siding. Choose a color that compliments the house’s dominant color if you’re replacing a section of the siding. However, choose colors that reflect your personality and style if you change the house.
- Consider the reason for changing the siding. The reason for changing your siding is critical in determining your exterior’s final look. If you redo the siding to change the material, you can retain the old color. However, you can pick a color that represents your preferred style if you’re remodeling for a completely different look or the house is new.
- Pay attention to the colors on other exterior parts. Pick a siding color that blends with other exterior features, such as the roof, front door, garage door, and windows. Put samples of those colors and create a visual representation to ensure they blend and don’t clash.
- Factor in the architectural style and size of your house. Light colors are best for large houses because they neutralize imposing features. Dark colors make unnoticeable features more prominent, and light colors give a sense of space in tiny houses and make them appear roomier.
- Choose colors that blend in with the neighborhood. Go around your neighborhood and check out the colors on homes with a similar architectural style to yours. You want your house to stand out but not look out of place, so go for the basic neighborhood theme, then add an elegant touch of your personality with a different shade.
Final Thoughts
Your home’s exterior is as important as the interior, so it deserves equal attention. While access to the indoor space is limited to your friends and family, the outside is open to everybody, and even strangers can appreciate its beauty.
Adding siding to stucco walls is possible, but it may require extra time and effort to ensure a successful installation. When installing your new siding over stucco, follow the above steps meticulously for outstanding results. If you doubt your ability to pull it off, seek professional services.
Sources
- Elite Home Exteriors
- Avalon Home Inspections: Can You Put Siding Over Stucco
- eHow: How to Install Siding Over Stucco Walls
- SFGate: How to Install Siding Over Stucco Walls
- Renodart Home Remodeling: How to Install Vinyl Siding Over Stucco – A Definitive Guide
- What is Vinyl: 4 Reasons To Put Vinyl Siding Over Stucco (Installing & Maintenance Tips)
- Semper FL Exteriors: Can You Put Siding Over Stucco on a House?
- Home Efficiency Guide: Can You Put Vinyl Siding Over Stucco? Key Considerations
- Energy.Gov: Insulation
Share this Post
Giovanni Valle is a licensed architect and LEED-accredited professional and is certified by the National Council of Architectural Registration Boards (NCARB). He is the author and managing editor of various digital publications, including BuilderSpace, Your Own Architect, and Interiors Place.
Comments
Great guide! Clear steps and helpful tips for anyone looking to add siding over stucco. Thanks for sharing this DIY resource.