Affiliate Disclaimer: Some of the links below are affiliate links. As an Amazon Associate, I earn from qualifying purchases.
A closet is one of the most important parts of a home. It is designed to hold your fashion accessories, but it can also be a storage space for any valuables you can think of. So, how can you build one?
To build a closet, you need to set aside the time required for it and the budget for the option you’ve chosen. You’ll also need some hand and power tools. While a closet can be completed as a DIY project, you may need professional help (and permits) if your construction involves electrical fittings.
In this guide, you’ll learn how you can build your closet from scratch. Watch out for the pros and cons of the different types of closets.
What are the Types of Closets?
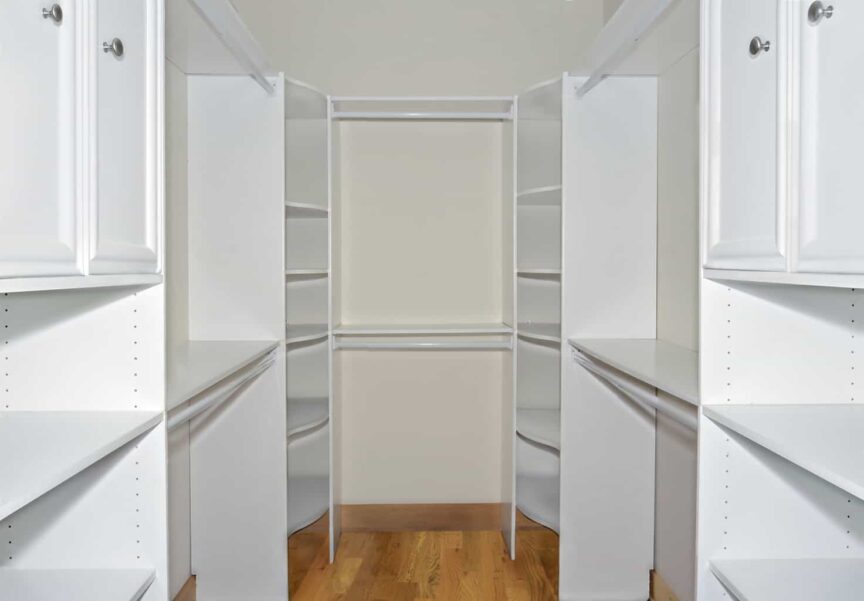
As you’ve seen above, a closet can either be a walk-in or reach-in design. The former is exactly as it sounds: you walk into the closet constructed like a room with lots of drawers, cupboards, racks, and hanger segments to take your belongings. It’s usually the most sophisticated type of closet, often designed with heating and cooling, lights, lots of mirrors, and more.
On the other hand, a reach-in closet is often a simplistic construction built onto a wall. It is usually a lot smaller, and you have to stand outside of it when taking out or putting in items. This is the option most chosen for DIY closet constructions.
What is the Cost of Building a Closet?
Building a closet can cost as low as $200 or as high as $3,000. As is the case with other home improvement projects, the cost of building a closet comes down to the approach you’re willing to take with the specific project.
The type of closet and the size are two big contributors to how much you’ll spend on the building process. You can expect to spend around $200 to $1,500 for a reach-in closet, while a walk-in option can cost between $1,000 and $3,000 to complete.
Factors to Consider When Designing a Closet
Your Budget
You need to know how high you’re willing to go with the spending on your closet project. Having a budget in mind will help you streamline the design and construction of your closet quickly.
If you’re only willing to spend around $250 on this project, you’ll have to focus on designing a reach-in closet without any fancy fittings. If you can afford to go as high as possible, you’ll have more freedom with your overall design choices.
Decisions such as the quality of the fittings to use, the style of door, the number of shelves, and other such details are all important determinants of how much you’ll spend.
The Space Available
Do you have enough room for a walk-in closet? A standard design can eat deep into the space in any bedroom. Without adequate space, a reach-in option is often best to go with. However, even with those, you still need to ensure you have the space to make the construction worthwhile and get the perfect closet to store everything you’d like to put away.
Again, the space available (and how willing you are to use it all up) can influence the cost of the project. Larger size constructions will require a lot more materials to finish.
Your Specific Storage Needs
What are the materials you intend to store in the walk-in closet? By having an idea of everything that will go into the closet, you can plan the design a lot better. Do you want your closet to hold your clothes and bags, or do you want it to also take your shoes and jewelry?
Answering questions like these, for example, will let you know if you need a plain construction or one with lots of shelves and levels (for reach-in closets) and dressing tables and island counters (for walk-in closets).
How To Build a Walk-In Closet
A walk-in closet is an excellent addition to any space. Constructing one from the ground up might look very challenging for a DIY project, but it is certainly doable with some carpentry skills.
All you need to do is to start with checking for inspiration and design ideas online. Once you’ve found the design that best matches your needs, it is time to get to work.
Here are the materials that you’ll need:
- Safety gear (gloves, masks, etc.)
- Level
- Dowel
- 3-inch (7.6-cm) screws
- Stud finder
- 16D nails
- 2X4 boards
- Drywall
- Tape measure
- Glue
- Circular saw
- L-shaped brackets
- Permanent marker or pencil
- Framing square
- Paint
- Doors
Once you’ve gathered the materials needed for the project, it is time to start the construction by doing the following:
Clear the Chosen Space
You already have an idea of where you’d like to have your walk-in closet. The best space for this construction is one that is close to your bedroom and also has rectangular or square dimensions.
Irregularly shaped spaces are not the best when constructing a walk-in closet. It will be harder for you to deal with the imbalance with the angles. It’s no coincidence that most walk-in closet designs on the internet today are built on square or rectangular spaces. You should also avoid selecting a room with excess windows because windows will reduce the wall you have to work with.
Don’t have a spare room to use? You can create a square or rectangular room within your bedroom using wooden partitions. That’s another bit of construction work to do that isn’t a focus here, but it is straightforward.
Once you’ve settled on the space for your closet, it is time to clear it out. Blinds, wall pictures, carpets, boxes, and anything else will get in the way while you’re working. With the clutter dealt with, clean the space with your usual cleaning supplies.
Get Measurements
With the measuring tape, measure the dimensions of the room, making a note of everything. Measure the width and length of the walls without forgetting corners. At this point, you should decide the measurement you want for various parts of the closet. You should go back to your design at this point to see what you’ve decided for scenarios like where to keep your shoes, accessories, and the size of your hanging space.
To get the best measurement with your hanging space, you should follow the proven rule of 1-inch (2.5-cm) allowance per item to be hung and 2 inches (5 cm) for coats and other winter wear. An average hanging space is typically 50 inches (127 cm) wide, but you can go as high as necessary if the space allows it.
With the measurements collected, it is time to tie it all in with your chosen design. Keep everything practical and consider breaking down specific areas into multiple small sections instead of a large one to create an organized design.
Build the Foundation
Once designs and measurements are out of the way, it is time to construct the foundation of your closet. The process will start with the woodwork. Cut wooden pieces in line with the measurements of each wall. You should measure twice before cutting wood pieces to avoid wastage.
When assembling drawer units, you’ll need to use dowels and glue. Two dowels should go on both sides of the divider. With drawer faces, you have to install the drawer slides and drawers first. Hold the drawer face in position and screw it in from inside of the drawer. Close up holes created by the screws with wooden buttons to ensure a clean finish.
Install the Shelves
With the basic setup of your closet completed, the next step is to install the units on the wall. With each unit, you have to use steel pipes to create L-shaped brackets for support. Once that is done, secure each of the brackets to the wall while maintaining a height of 12 inches (30.5 cm) away from the ground. You should also fix the same bracket at the top of the unit, 12 inches (30.5 cm) away from the ceiling.
Fixing L-brackets to the wall involves locating the stud and marketing where you’d like to position the bracket on the wall. Screw the studs into the wall with 3-inch (7.6-cm) screws. Once you’ve set up the shelves for the main units, you can repeat the process for the drawer units. With all the units completed, fix the doors, and your job is almost done.
Add Some Finishing Touches
This is the time to paint portions of the closet (or the entire structure) if necessary. Also, the best walk-in closets are properly illuminated. You can go with LED strip lights or bright lights to help you see color properly and find items quickly. You may also want to install mirrors, fans, and anything else you deem necessary to make the closet comfortable.
However, you should check to see what local building codes say about installing electrical fittings in your home. In many cases, only a licensed electrician is allowed to do the job.
Pros of Walk-In Closets
- They are great for staying organized. If you have lots of clothes, shoes, and accessories, the closet will make it easier for you to arrange everything neatly. You no longer have to lump different items together, only to ransack the entire room when looking for specific items. You can easily designate different shelves for various items.
- You can dress in privacy. Walk-in closets are spacious enough to allow you to dress up in privacy when you’ve got other people in the room with you. All you need to do is to lock the door behind you when you’re in the closet.
- They are great for maximizing space. If your bedroom is oddly shaped, you’ll love the fact that you can square off a regular shape for use as a closet. This way, you can free up other parts of your bedroom.
Cons of Walk-In Closets
- Items can get misplaced. The shelves and overall design in an average walk-in closet are such that you can find items disappearing into corners, forcing you to spend hours looking for them. You may also get confused on what item is stored where without labeling or color-coding drawers and shelves.
- The construction is difficult and expensive. Building a walk-in closet will almost always be more expensive than a reach-in closet. Even when you choose to go with a no-frills construction, you will spend more. The size of an average project also means you’ll spend a lot of time putting it all together. The construction may be challenging for even the most ardent DIY enthusiasts.
- You will lose space elsewhere. Whether you’re partitioning off a part of your bedroom or converting a previously empty space, a walk-in closet is space-intensive.
How to Build a Reach-In Closet
If a walk-in closet doesn’t appeal to you or you can’t find space for it, you should consider the reach-in option. This is usually a more straightforward construction.
These are the tools and materials needed:
- Drill
- Tape measure
- Nail gun
- Kreg jig
- Miter saw
- Level
- Stud finder
- Closet wardrobe track kit
- Joint compound (all-purpose)
- Drywall spray texture
- Pieces of 2x4x8′ wood
- 2 1/2″ (6.35cm) wood screws
- Closet doors
With everything gathered, here’s what you should do:
Map and Measure the Spot for the Closet
When building a reach-in closet, the first thing to do is to find the spot for it, in line with the size you’d like the completed project to be. You should also consider the door type at this stage.
If you have enough space, you can use traditional doors that will swing outwards. In smaller spaces, a sliding door will likely work best. With measurements, you should aim for a minimum depth of around 24 inches (61 cm). You can go to 30 inches (76 cm) if you intend to hang bulky items in the closet.
After you’ve made up your mind on your closet’s location and size, the next step is to draw up where you expect the new wall to be installed. You need to keep in mind that the wall will be thicker as soon as you add drywall. When drawing the guideline, you should use a level to ensure the vertical guidelines are plumb.
As you attach the closet frame to your bedroom walls, you should ensure there are studs behind the drywall where the screws will get attached. Ensure the new wall is secured tightly to the studs instead of directly on the drywall. Find the studs behind the drywall using a stud finder and make a note of their locations on the guidelines you’ve drawn.
Fix the Top Plate to the Ceiling
The top plate here refers to the wooden frame component you’ll use as the top runner for securing your wall studs. The top plate has to run across the entire length of the wall. Get the tape out to find the total length of your closet wall. Cut a 2×4 wood of that length, and you’ve got your top plate.
Once you have the wood, attach it to the top ceiling with 2 ½” (6.35cm) wood screws, following the guidelines. Confirm that the screws pass through the drywall and into a joist with every fixing; otherwise, the plate will not be stable enough to keep the closet wall durable enough to carry hung items.
Build the Framing of Your Closet Wall
The next step is to repeat the process above to get your bottom plate. The plates are responsible for holding the frame of the wall. Connect the stud and the bottom plate using 2 ½-inch (6.35-cm)wood screws. Connect both plates by drilling pocket holes at the studs to complete the rest of the frame.
Install the Header
This structure provides support like a beam. It will hold the sliding door and the rails. A single 2×4 header is usually enough for sliding doors, but you may need to double up if you intend to use heavy hinged doors. You should ideally install the header on your trimmer studs. Don’t forget to take the drywall thickness into account when installing the header.
Cut Out and Install the Drywall
Begin with the biggest sheetrock pieces and work your way down to the smaller sections. Measure out where the sheetrock has to be cut and draw a line to guide you. Use your utility knife to cut through the paper layer of drywall. Install the drywall on the closet wall, using drywall screws to hold it in place.
Fix the Corner Bead
To install this, first, you have to cut it to length with snips. Ensure the bottom is at least half an inch (1.27 cm) off the floor. Press the bead to the wall and use drywall screws or nails to hold it in place. The nails should be spaced eight inches (20.3 cm) away from each other to ensure a balanced hold along each of the legs.
Smear the Closet Wall Using All-Purpose Compound
Ensure the floor is protected before you get started with this process. Using a drywall knife, apply a coat of all-purpose compound like the US Gypsum 380270 to the drywall’s joints. Be sure to not apply too much of the compound, or it will crack when dry.
With the first coat dry, sand off any rough spots you find on the drywall with a sanding block. Then, apply a second coat along the wall again.
Use a Texture Spray on the Drywall
After the second coat of compound has dried off, sand the drywall lightly, and then spray it with a product like the Homax 20-Ounce Oil-Base Drywall Spray Texture. You can choose between light or heavy spray patterns, but you should go with the latter for a better overall look.
Paint the Closet Walls
With the texture dried completely, you should use a sanding block to smoothen off high and rough areas. Once that’s done, paint the wall using a paint roller. The color to choose will come down to your preferences but go with an option that matches the overall décor of the space.
Fix the Doors
If you’re going with a hanging door, your construction will be slightly different as you’ll have to frame the closet in a way that the hinges will have a position. However, if you are using a sliding door, the instructions for fixing the rails will come in the user manual. Once the rails are fixed, installing the door is easy.
Pros of Reach-In Closets
- They encourage minimalist living. Without a lot of room to store tons of stuff you don’t need, you will be more open to getting rid of the clutter in your home more frequently. Instead of allowing clothes, shoes, and other accessories to pile up uncontrollably, you’ll be more open to giving some of it away.
- You can stay up to speed on your property. With a reach-in closet, you can quickly eyeball all your belongings once the doors swing open. This is especially true when you have organized the closet very neatly. Seeing everything you own at once can help you avoid a dual purchase. You’ll also be less likely to make impulse purchases because of the awareness that you may not find a spot for the item in your closet.
- They are affordable and easy to build. You can complete your reach-in closet construction with a few hundred dollars, and the construction process is straightforward, as we have seen above. Whether you’re going the DIY route or paying a contractor for the job, you can expect to spend less money on a reach-in closet construction.
Cons of Reach-In Closets
- You can outgrow them quickly. As your current situation changes, you may find your reach-in closet to be inadequate. For example, going from a single person living alone to having a partner may lead to your closet getting filled up quickly.
- You won’t have adequate space for everything. The closet is the innermost part of many people’s homes, where they put away everything from collectibles to their seasonal supplies. With a reach-in closet, you most likely won’t have extra space for anything more than your regular fashion accessories.
- There’s no privacy. With a reach-in closet, you have to dress up in front of the closet. This is not ideal in shared spaces. Similarly, anyone around can immediately peer into your personal belongings as soon as the closet doors swing open.
Should You Hire a Contractor for Your Closet Construction?
DIY closet installations are not for everyone. If you can’t complete the process after following this guide or watching videos elsewhere online or just don’t have the time, you can hire a contractor to get the job done.
A qualified carpenter will bring your desired closet to life. With a walk-in closet, you may also need to hire an electrician after the carpenter has done their part—if you want it illuminated properly.
When hiring a contractor for your closet construction, you should apply the same caution as you would when paying for a bathroom remodeling or other costlier home improvement projects.
Here are a few things you should keep in mind:
- Choose a qualified professional. This project is rarely very expensive (even for walk-in closets), but you can still lose money and end up paying twice or thrice the costs if you choose an unqualified contractor. Damages to your bedroom wall can cost a lot of money to repair. You also don’t want to waste the materials you’ve bought for the closet construction.
- Ask for samples and designs. The professional should have no problems with showing you closets they’ve designed in the past. This is important for two reasons: you get to see what kind of skills the contractor has shown in the past and see possible designs to replicate.
- Ensure the contractor understands building codes. While most states won’t have stringent codes for constructing a reach-in closet, a walk-in variant will most likely trigger some laws. Your chosen contractor should know everything, securing permits to get the job done.
- Get a quote ahead of time. To avoid any bad surprises, you should know the cost of your closet construction upfront. Get it in writing if necessary. Remember, it’s easy for a $500 project to end up becoming a legal case that will cost you thousands.
- Agree on a schedule. Once you’ve squared off everything else, including the cost of the closet construction, you should work out the schedule for the project. This is most important with a walk-in design, which will invariably take more time to complete. Find out how long it will take to get the job done for the contractor.
Conclusion
Building a closet can be a rewarding experience. You get to create some space in or around your bedroom to neatly organize your valuables and personal effects. The work starts right from the design stage, where you have to draw up a template that meets your needs.
Can’t create a design from scratch? You can find a perfect closet design you can emulate online regardless of your unique situation. Alternatively, you can always hire a professional to get the job done—especially since the construction costs are generally affordable.
Sources
- All About Closets: Walk In Closets vs. Reach In Closets: The Pros and Cons of Both
- Storables: A Step-By-Step Guide To DIY Walk In Closet
- Lazy Guy DIY: A HOW TO GUIDE TO DIY BUILT IN CLOSETS
- Better Homes and Gardens: How to Build a Closet Organizer
- Home Advisor: 2021 Custom Closet Costs: New Builds & Remodels
- Home Tips: How to Build a Closet
- The Spruce: How to Build Your Own Closet
- The DIY Plan: How to Build a Closet in a Bedroom
- WikiHow: How to Build a Closet
Share this Post
Giovanni Valle is a licensed architect and LEED-accredited professional and is certified by the National Council of Architectural Registration Boards (NCARB). He is the author and managing editor of various digital publications, including BuilderSpace, Your Own Architect, and Interiors Place.