Affiliate Disclaimer: Some of the links below are affiliate links. As an Amazon Associate, I earn from qualifying purchases.
Block walls provide excellent structural support, and adding cement can make them exponentially stronger. Most block walls are core filled during the construction process. However, you’re probably wondering if you can achieve the same strength and support for an existing block wall.
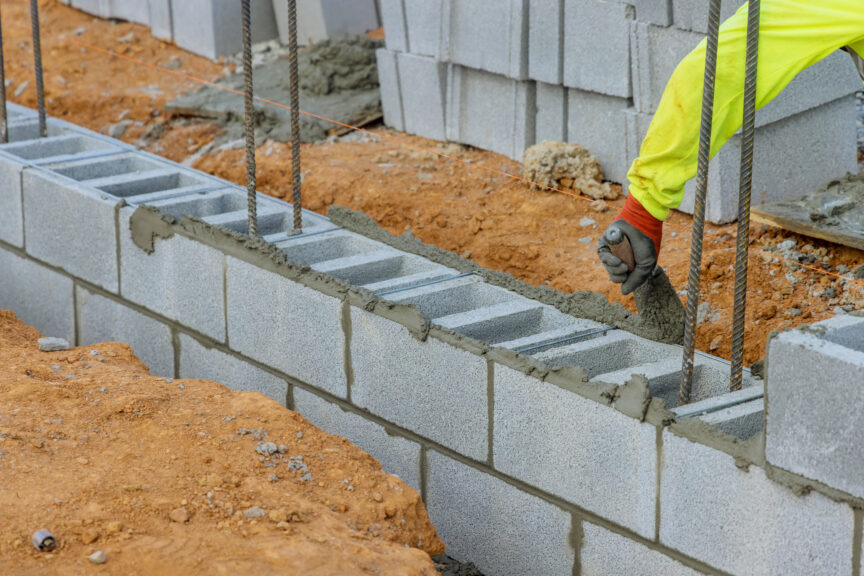
To core fill an existing block wall, make a hole in the highest block with a cement cutter, then mix your concrete. Next, pour your concrete into the hole with a PVC pipe or a cement funnel. Level the concrete at the bottom of the exposed block, then pack and seal it with dry aggregate.
Throughout this post, I’ll explain how you can core-fill an existing block wall, including all the tools you’ll need to get the job done.
1. Make a Hole in the Block Wall
The easiest way to cut a hole in a block wall is by using a cement saw. You can also punch a hole in the wall with a flathead and a hammer, but it’s not nearly as clean or quick.
Keep these suggestions in mind when making the hole:
- Cut the highest block possible without slicing into the rebar. If you cut the rebar, you’ll need to add more of it, which can be very difficult for an existing block wall.
- Choose a center block that doesn’t sit above a doorway or an arch. You’ll end up putting a lot of direct pressure from the cement on the arch, causing it to crack.
- Avoid cutting into a corner block. The goal is to fill as much of the block wall as possible. If you start at a corner block, you’ll fill the wall at a slanted angle.
- Mark or tape the cutting surface to follow easily. Painter’s tape is perfect for marking before cutting. You can easily remove the tape when you’re done with the cut.
2. Mix Your Concrete On-Site
A high-quality concrete mix will keep the wall from bulging, and it’ll also allow the concrete to dry. The mixture should have a decent amount of aggregate when you’re done. Overmixing will end up making the concrete far too soupy.
Here’s the step-by-step process:
- Mix 80 pounds (36 kg) of concrete into 2.5 gallons (9.46 liters) of water. You’ll likely need to repeat the process multiple times.
- Stir it with a concrete mixer until you notice all of the dry powder is gone.
- Pour the concrete into the existing block wall within one to two hours of mixing it to prevent it from drying.
You can also watch this helpful core-filling YouTube video for more details:
3. Choose Your Pouring Method
There are many ways to pour concrete into an existing block wall. Always go with the method you feel most comfortable with since working with concrete can cause muscle and joint pain. Consider hiring a laborer for the job if possible.
That said, you can also try one of these suggested methods to pour your concrete mixture into the block wall:
- Use a 4-inch PVC pipe. Slide the PVC pipe into the block wall cutout, then slowly pour the concrete into the pipe. I recommend having someone hold the pipe while you pour the concrete. This preventative suggestion will stop the pipe from shaking, which helps achieve a much more even pour without air bubbles.
- Get a concrete cell funnel. The Tampa Bay Tools Concrete Cell Funnel (available on Amazon.com) latches into the block wall, letting you pour with both of your hands. It clips on any exposed block, and it has a protective coating that easily washes away all of the excess concrete when you’re done.
- Pour the concrete into the block hole directly from the bucket. This is undoubtedly the messiest method, but it works in a pinch. You’ll likely need to clean the wall after pouring the concrete. Make sure the bucket is rated to hold over 80 pounds or 36 kilograms (or however much concrete you’re using). The last thing you want is for the handle to break mid-pour.
4. Level the Concrete
Leveling your concrete is a crucial and irreplaceable part of the filling process. If you don’t level the concrete, there’s a much higher chance of air bubbles forming. Furthermore, it could cause the blocks to shift or the concrete to settle unevenly.
According to eHow, you should level the concrete in a block wall by using the back of a cement trowel. This tool ensures you don’t waste any of the cement. It’s also perfectly flat, which is exactly what you need when core-filling a wall.
Another thing to remember is that concrete often takes a while to settle. I recommend pouring the concrete, leveling it with a trowel, then waiting a few minutes to check if the level went down a bit. Repeat this process until the concrete stays at the bottom of the cutout without sinking.
5. Pack and Seal the Block Wall
Packing and sealing the block wall are the last two parts of the modification. Brisk Hand recommends using sand and concrete to fill the block wall cutout.
Try this process:
- Pour dry concrete into the cutout with the same funnel you used to pour wet concrete into the wall.
- Use a cement trowel to pack the concrete and mix it with the existing wet concrete in the wall.
- Remove the funnel and use the back of the cement trowel to level the vertical face of the wall.
Note: When packing and sealing a block wall, make sure you cover as much of the hole as possible. Excessive air gaps can weaken the block’s structural integrity, making it a bit weaker than it should be after adding cement. You could add a cup of water to the dry cement after stuffing it into the cutout to make it easier to work with.
Final Thoughts
Core-filling a block wall with concrete can make a big difference. The good news is that you don’t have to remove the whole wall or remove an entire section to add cement. The most important part is to use the proper cement ratio and pouring method.
Sources
- Brisk Hand: How To Core Fill An Existing Block Wall? 5 Best Steps
- eHow: How to Pour Concrete Into Block Cores
- YouTube: Cell Funnel Demonstration Video – REMODELING EXISTING BLOCK WALL DOOR – SHORT VERSION
Share this Post
Giovanni Valle is a licensed architect and LEED-accredited professional and is certified by the National Council of Architectural Registration Boards (NCARB). He is the author and managing editor of various digital publications, including BuilderSpace, Your Own Architect, and Interiors Place.