Affiliate Disclaimer: Some of the links below are affiliate links. As an Amazon Associate, I earn from qualifying purchases.
Installing drywall on the ceiling is not the most comfortable task. Working on ceilings often means twisting at odd angles and potentially causing pain in your back and neck. A drywall lift is the easiest way to get things done but if it’s not available, you need to look at other options.
Here’s how to install drywall on the ceiling without a lift:
- Determine an alternative to using a lift.
- Gather your materials.
- Prep your workspace.
- Find the joists.
- Measure and measure again.
- Mark and cut.
- Mark again.
- Preset screws or nails.
- Attach the drywall.
- Repeat as necessary.
- Cut holes for fixtures as needed.
In this article, you will find more detailed guidelines on how to install drywall on your ceiling even if you have no lift. Keep reading to learn all the pertinent details.
1. Determine an Alternative to Using a Lift
When using a drywall lift, you load the drywall onto the arms, turn the wheel to raise the arms and set the drywall flush against the ceiling joists. The lift holds the drywall in place so you can secure the drywall to the ceiling. If you don’t have a lift, you need to find something else that will do this for you. There are several options:
- Have someone help you. An assistant is the best option if you are using full sheets of drywall and not cutting it down, as the drywall can be very heavy, and lifting it by yourself can cause injury. One person can hold the drywall in place while the other secures it.
- Use a different product. Another good option is this convenient BoardMate Drywall Fitting Tool from Amazon.com. To use it, attach the BoardMate to the joist where you want two drywall pieces to meet. When you slide the drywall between the BoardMate and the ceiling, the Boardmate holds the drywall flat so you can properly attach the drywall.
- Install temporary support. If your walls are not up, you can attach a scrap 2×4 into a stud just below the ceiling and slide the drywall in between to give you extra support.
- Build a brace. If you don’t want to risk damaging your walls, another option is to build a deadman brace, also called a T-brace. To do this, secure a 2 feet (61cm) piece of 1×4 to a 2×4 that measures about 1 foot (30cm) longer than the ceiling height.
2. Gather Your Materials
Once you’ve chosen how you’re going to keep the drywall in place, it’s time to make sure you have everything you need. This includes:
- Your drywall lift alternative
- Plastic sheeting
- Lighting, if needed
- Tape measurer
- Pencil
- Notebook or scrap paper
- One ladder per person
- Stud finder or hammer
- Drywall sheets
- Utility knife
- Drywall T-square
- Drywall screws or nails
- Hammer or drill/impact driver with magnetic driver bit and drywall dimpler bit
- Drywall adhesive (not necessary, only use if preferred)
- Spiral saw
- Respirator
- Safety goggles
Screws or Nails: What Should You Use?
You can use either screws or nails when putting up drywall along the wall. Nails are cheaper and require less equipment. However, drills are easier to use when working on a ceiling, and they are sturdier than nails. They are also much stronger against gravity.
If nails are your only option, you may want to consider drywall adhesive.
Do You Need Drywall Adhesive?
Drywall adhesive is not necessary, but there are situations where it may be more helpful. If you don’t have access to a drill and need to use a hammer and nails, the adhesive will add an extra defense against gravity.
If you’re using screws, drywall adhesive can create a more sturdy, smooth surface and prevent screws from “popping” or protruding through the drywall.
What Type of Bits Do YouI Need?
The best bit to go for if you’ve opted to use screws and a drill is a dimple bit. This allows you to embed the screw into the drywall without ripping the drywall paper. Having the screw slightly embedded will also make the mudding process easier.
3. Prep Your Workspace
Preparing your workspace allows you to avoid problems ahead of time and keep things clean:
- Check the ceiling for any obstructions. You may need to remove vent covers or light fixtures. Make sure those are way out of the way. If live wires are exposed, it may be necessary to cut power to the room. Set up lighting If you need to cut the power.
- Check around your workspace for other obstructions. Remove anything that could cause injury or you might trip over.
- Set up plastic sheeting. If you have to cut into the drywall, the process creates dust that can get into all sorts of nooks and crannies. Laying down plastic sheeting or tarps will keep the dust from getting into floors, countertops, and your appliances.
- Set up your ladder. Ensure you have one for yourself and an extra one if you have someone helping you. Set your tape measurer, stud finder or hammer, pencil, and paper on the tray.
4. Find the Joists
If you’re putting the drywall over an existing ceiling, you aren’t going to be able to see the joists. A stud finder is the best option here. This Craftsman Stud Finder from Amazon.com has over ten thousand reviews and is inexpensive. If a stud finder isn’t available, you can use a hammer to find the joists by tapping and marking the spots that sound solid instead of hollow. Use your pencil to mark the positions.
If you’re planning on using more than one sheet of drywall, find the joist where you want them to meet and mark it in the center.
5. Measure and Measure Again
To avoid wasting time and resources, take multiple measurements and double-check them. This is especially important if your space is oddly shaped. Write down your measurements to ensure you won’t forget them.
Once you’ve measured the size of the sheet you’ll need, you also want to measure the joists’ positions as well as anywhere you’ll need to cut into the drywall. These include fan or light openings.
6. Mark and Cut
Once you’ve double-checked your measurements, use your pencil to mark down anywhere on the drywall that you need to cut. Double-check these marks as well. You don’t want to cut the wrong spot.
When it comes to cutting your drywall, all you need is a utility knife. However, you want a knife that’s strong and sharp so that your cuts are clean. This OLFA Heavy-Duty Utility Knife from Amazon.com has over 2,000 reviews averaging 4.8 stars and is meant for jobs such as installing drywall. Use a T-square to ensure your cuts are straight.
If the edges of your drywall are rough and jagged, it will be necessary to sand them down. Simple jobs can be done with basic sandpaper, but you may need something more for extremely jagged edges. The Tajima Drywall Rasp from Amazon.com is explicitly made to smooth out drywall edges and has excellent reviews.
7. Mark Again
Now that your drywall is cut, it’s time to make a few more marks so that things go as smoothly as possible when it’s time to put up the drywall. There are a few spots you may want to mark. Aren’t you glad you wrote everything down?
- Mark the sides. If your drywall is close but not quite square, you may find it helpful to mark the edges. This ensures you’re orienting it right when it’s time to put it up. Something as simple as “left” and “right” will work.
- Mark the joists’ positions. These are the spots you’ll want to drill into, so it’s essential to mark them. Because you’ll also want to add screws along the joists, this is a good time to mark a line to ensure you get the screws in the right place.
- Mark positions for any ceiling fixtures. You will be cutting holes for these after attaching the drywall, so you need to know where they are. Try to be as thorough with these markings as possible, so you don’t end up cutting an area you aren’t supposed to.
8. Preset Screws or Nails
While not a crucial step, having your screws partially drilled in or your nails partially hammered will make your life easier once you go to attach the drywall. Screw or hammer at the joists marks embedding them far enough such that they won’t fall out but not so far that they poke through the other side.
If preferred, you can also apply drywall adhesive to the joists before moving on to the next step. As mentioned above, this is not a necessary step though it has its benefits.
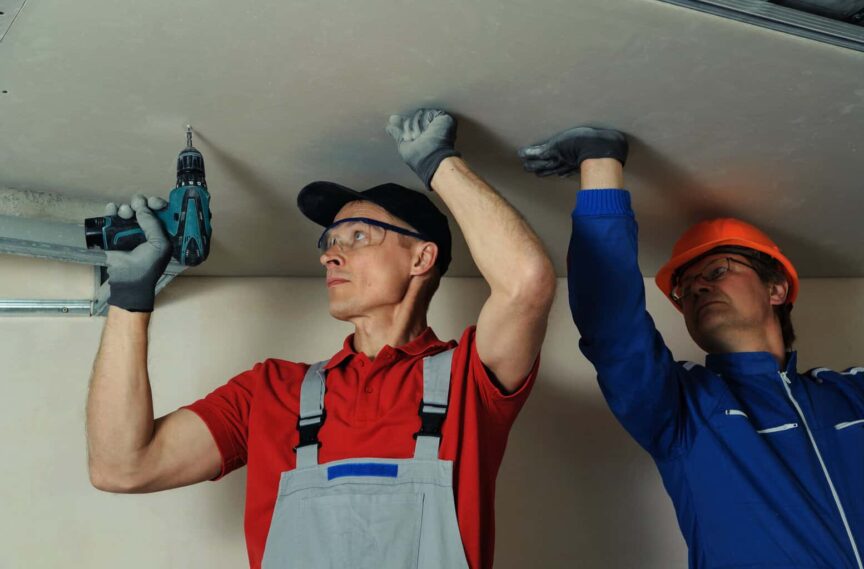
9. Attach the Drywall
Now that you’ve measured and cut, it’s time to attach the drywall. Typically, this is where you’d use a drywall lift. However, this is where you’re going to use whatever option you chose to replace the drywall lift:
- If you’re having someone help you, have them climb up on their ladder and hand them one end of the drywall. Climb up your ladder while you hold the other end. Once you’ve ensured everything is lined up correctly, have your assistant hold the drywall in place while you drill the pre-drilled screws (or the pre-hammered nails) into the joists.
- If you’ve opted to drill a 2×4 below the ceiling or use a tool like the BoardMate, these need to be screwed into place if you have not yet done so. Slide your drywall between the 2×4 or the Boardmate, then secure it into place with the screws or nails you had preset.
- For the T-brace or deadman brace, the goal is to wedge the brace between the drywall and the floor to keep the drywall in place. You may need to hold the drywall against the ceiling with one hand while wedging the brace into place with the other. Once everything is stable, finish drilling or hammering your preset screws or nails into the joists.
Once you’ve secured the drywall with your preset screws or nails, continue to tighten the drywall along the joists, spacing them about 10-12 ft (3-3.5 meters) apart.
10. Repeat as Necessary
If you’re covering an entire room rather than one small space, you’ll need to repeat most of the steps below:
- If you haven’t already, remove vents and lighting fixtures.
- Ensure that the next area is properly covered by plastic or a tarp as needed.
- Find and mark the joists if you’re putting drywall over the existing ceiling.
- Measure and cut the drywall to size.
- Mark the locations of the joists onto your drywall and partially insert screws or nails at those points.
- Use adhesive if preferred.
- Using your lift alternative, set the drywall in place.
- Secure drywall to joists.
11. Cut Holes for Fixtures as Needed
Now that you have a smooth drywall ceiling, it’s time to cut holes into it. This is where your spiral saw will come in handy. The Rotozip Spiral Saw Toolkit (available on Amazon.com) is Amazon’s choice and is reasonably priced with good reviews. The great thing about the Rotozip is that it has an attachment that sends dust away from the user. That said, it’s always a good idea to wear safety gear like a respirator and goggles.
Find the places you marked for fans, lights, etc. If the hole is larger and it is safe to do so, it may be beneficial to cut a small square inside the hole and use that to find the edges. Then you can simply run the saw along the inside of the hole. If this is not an option, take extra care to keep your cuts clean.
Now that your ceiling is complete, all that’s left is to clean up your mess and order some pizza for your assistant.
Conclusion
While a drywall lift is the easiest route to take, there are other options to getting your drywall secured to the ceiling. An assistant is highly recommended, but you can also use a deadman brace, a tool like the BoardMate, or even a simple scrap 2×4. With proper support, proper safety gear, and lots of notes, you’ll have a beautiful ceiling in no time.
Sources
- Instructables: How To Hang Drywall Ceilings By Yourself
- eHow: How To Make a Deadman for Drywall
- Home Advisor: Drywall Nails vs Screws
- WikiHow: How To Install Ceiling Drywall
- YouTube: Hang Drywall on Ceiling by Yourself
Share this Post
Giovanni Valle is a licensed architect and LEED-accredited professional and is certified by the National Council of Architectural Registration Boards (NCARB). He is the author and managing editor of various digital publications, including BuilderSpace, Your Own Architect, and Interiors Place.