Damp proofing is an important type of barrier built into the walls and floors of buildings in order to keep moisture from penetrating the surfaces, causing serious damage. This is an issue that’s most common in residential homes and smaller buildings.
Damp proofing is worth the cost it takes to be installed. In the end, if it’s done correctly, damp proofing can save you money by preventing damage to the interior surfaces that can be caused by dampness and moisture.
If you live in a climate that’s particularly moist and humid, you might already have damp proofing in your home. Perhaps you have dampness somehow getting into your home, and you’re not sure whether or not you have existing damp proofing. Or, you’re hoping to damp proof your home yourself. If any of these applies to you, stick around: we have all things damp proofing right here.
What is Damp Proofing, and Why Do You Need It?
Before we can get into exactly why damp proofing is worth your time and money, let’s talk about what damp proofing entails. Damp proofing is using various materials to keep outside moisture from getting through to the interior of a building.
The damage that can be done by dampness and moisture can be severe. Damp proofing is especially important in areas that have high humidity and moisture in the air or ground for that matter. If there is dampness and moisture outside, it’s imperative that it stays there…and doesn’t seep into buildings.
Damp proofing that’s done to prevent ground moisture from infiltrating an interior space is usually done right about six inches above the ground. However, this does fluctuate, depending on the materials that are being used.
Methods of Damp Proofing
While damp proofing any structure doesn’t guarantee that moisture won’t get inside, it still a very effective barrier against such. However, there are different methods that can be used for damp proofing and choosing the correct one for the project is an essential part of the equation.
Here are the most commonly used means of preventing moisture from the exterior getting to the interior. Typically, one of these, if not a combination of two or more, is the best route, and the one most recommended by contractors.
Pressure Grouting
Grouting is a method of applying a material into the seams, usually in between tiles.
However, pressure grouting uses – well, pressure – to shoot cement into spaces that might allow moisture to penetrate a surface.
The high intensity of the pressure helps to ensure that the cement grout is able to get into hard to reach areas. And even though these might be small spaces, they can be the biggest culprits in allowing dampness to get inside.
Integral Damp Proofing
Adding strength to concrete while it’s mixing is another way of adding damp proofing to a building. The extra strength comes from waterproofing materials that are added in before the mixing stage of the concrete process, so they’re fully combined, allowing them to set with the concrete.
Here are some of the different waterproofing compounds that are used with integral damp proofing:
Commercial Products
As with most things, there are products available to add to concrete before it’s mixed, to give it the quality of being damp proof. Each product has a specific method and amount necessary to achieve an effective level of damp proofing. It’s important to follow the directions set by manufacturers to make sure the product is used efficiently.
Mineral Water Proofing Compounds
Adding mineral compounds to concrete can give it an impermeable formula, giving it the necessary damp proofing qualities. Mineral compounds that are used to add damp proofing qualities to concrete are:
- Chalk
- Clay
- Talc
- Fullers Earth
Repellant Water Proofing Compounds
While mineral waterproofing compounds give concrete the ability to keep dampness from getting in, there are other compounds that will repel water, sending the moisture away from the building. Adding these items while mixing concrete will give concrete the ability to repel moisture and dampness:
- Soap
- Fatty Acid Compounds (stearates of sodium, calcium or ammonia)
- Petroleum
Chemical Water Proofing Compounds
Waterproof concrete can also be achieved through various chemical compounds. These are also accelerants to help concrete dry faster. Some of the more commonly used options include:
- Alkaline Silicates
- Aluminum Sulfate
- Calcium Chloride
Cavity Wall Construction Damp Proofing
This is another means of damp proofing that relies on the sandwiching principle of putting the damp-proof material between two walls. This method has a simpler explanation. There’s an outer wall and an inner wall, leaving a space in between the two or in the cavity.
The space between the two walls is effective in preventing the exterior moisture from penetrating the interior wall. This particular method of wall construction is effective damp proofing but can also double as creating a quieter space. There’s an added bonus with this type of damp proofing.
Membrane Damp Proofing
To achieve this method of damp proofing, a damp proof course, a.k.a. DPC is sandwiched between the ground or outside air and the structure it’s protecting. The layers will be: ground, DPC, and floor – or air, DPC, and wall. The materials used to create DPC are flexible, and often include:
- Bitumen
- Plastic sheets
- Cement
- Slate
- Concrete
- Polythene sheets
- Bituminous felts
- Metal sheets
There are a few important things to remember with membrane damp proofing in order to maximize the effectiveness of the damp proof course.
- DPC should fully cover any of the exterior walls. Whether they’re load-bearing or not, all walls should be covered.
- There should be no exposed area left uncovered by DPC. This causes a weak spot, where moisture and dampness will be able to get it anyway, making the rest of the damp proofing ineffective.
- Ensuring a level base for DPC is crucial. Leveling the surface, such as a mortar bed, and making sure that it’s even and smooth, will prevent any damage being done to the damp proofing material.
- Be mindful of where you put your seams.
- Even though it’s impossible to find DPC with enough length to fully cover a whole surface in just one piece, it’s important to make sure that the seams aren’t done at a point where flooring or walls meet.
- When there are seams on a floor, in addition to making sure they’re not set at a corner, using a concrete fillet at the joint is necessary to strengthen the meeting point.
- Continuous projection is key for DPC.
- The layers are important. Making sure the damp proof course is actually sandwiched between two materials is the only way to ensure that it’s not damaged from any additional construction and protected from other harmful elements (like heat or wind).
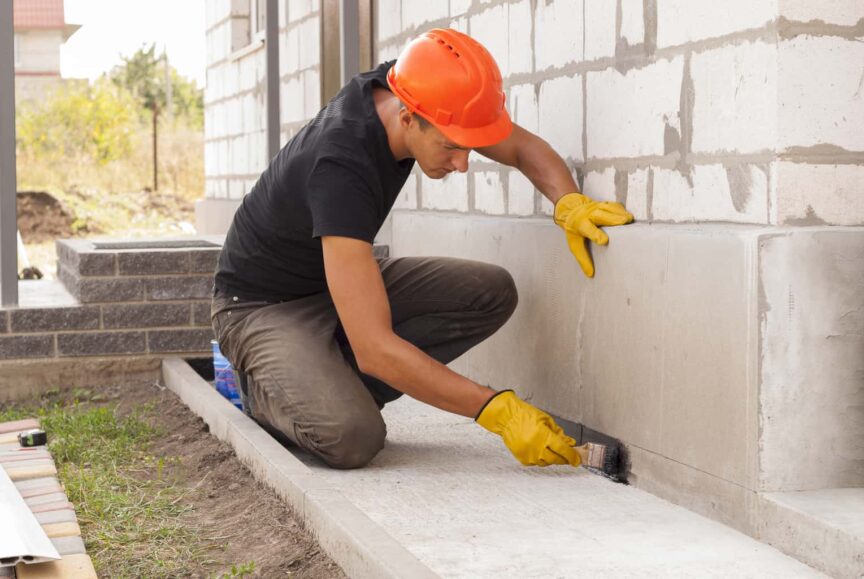
Surface Treatment Damp Proofing
There are many building materials that are various levels of porousness. While these materials do serve a purpose, whether it’s practical or aesthetic, they do allow moisture to seep into a space through their pores. Therefore, these tiny holes need to be sealed by treating the surface. Some of the more porous materials that need surface treatments are:
- Brick
- Stone
- Mortar
- Wood
Sealing the pores can be done in a few different ways. Of course, this depends on the material itself. It’s also important to consider the amount of moisture and dampness that could possibly penetrate these surfaces.
The most common way of sealing a porous surface is spraying a water repellent, which will keep dampness out. Some of the types of damp proofing solutions that can be sprayed on as surface treatments include:
- Aluminum or zinc sulfates
- Magnesium sulfates
- Barium hydroxide
- Sodium or potassium silicates
Guniting
This method isn’t used very often, but it’s worth mentioning. It was once upon a time one of the most frequently used methods of damp proofing and even used in the construction of swimming pools.
This is another high pressure, and oddly satisfying, method of damp proofing. It’s kind of fun to watch the cement mortar shoot out of the machine and cover the surface, so it’s kind of a shame that it’s not used as often anymore.
Any exposed surfaces that could allow moisture to get in, such as pipes, are covered in guniting. The cement mortar mixture is shot out of a cement gun at a high pressure, where it will dry and become a permanent, damp-proof fixture.
How Damp Proofing Is Different Than Waterproofing
All of this information might have you thinking, “how is any of this different than waterproofing?” The answer is fairly simple:
Damp proofing is a way to prevent ground dampness and humidity from the air from getting inside of a structure, usually a residential one.
Waterproofing is done to keep water and heavy-duty moisture from entering a building. More specifically, water with hydrostatic pressure, or the amount of pressure that comes from water. Different levels of water exert different amounts of pressure, depending on the depth. This is why flooding can cause such irreversible damage.
While damp proofing is effective in keeping dampness from entering a space and causing damage, waterproofing is essentially more extreme measures that are taken to prevent actual water from causing damage.
Waterproofing is often done with different materials. But, while damp proofing is used to keep dampness and moisture outside, from getting inside, waterproofing is done to keep water from moving from one space to another, whether it’s outside or inside. For example, a waterproofing barrier is used in a bathroom to prevent leaks from going through the floor or walls, causing extensive damage.
Can You Do Damp Proofing Yourself?
Yes, sometimes, you can damp proof areas of your home yourself. However, many of the means of damp proofing must be done during the construction phase. Methods like mixing in concrete compounds and cavity construction aren’t exactly things you can do on your own after a home or building has already been finished.
But this doesn’t mean that you can’t take extra damp proofing measures on your own, in order to further protect your home, or even office, against dampness. Especially the nasty rising damp that can infiltrate your space and wreak havoc.
Water damage can be catastrophic, even if it’s the result of dampness, but again, we’ll save that for a different day. It’s just worth noting and keeping on the backburner. It’s just one of those things you don’t want to learn the hard way.
How to DIY Damp Proof a Home or Building
Older buildings and homes might be experiencing deteriorating damp proofing, especially in more humid climates. It’s also possible that damp proofing wasn’t done properly when it was installed, or in some cases, there’s no damp proofing at all.
In these situations, DIY damp proofing might be your first line of defense. Although, if you’re already experiencing signs of water damage, it’s recommended that you consult a professional. Water damage is not something to take lightly. Yes, I know we’ve mentioned this a few times already, but I feel like I have to work it in wherever I can, so everyone knows just how serious it is.
It’s also important to consider the size of the area that needs damp proofing. Something that’s bigger might require materials that don’t lend themselves to DIY applications, or they might require specialized tools for applications like concrete drill bits.
Damp Proofing Creams
One of the most readily available and easy to use DIY damp proofing products comes in the form of a damp proofing cream. This type of product is not meant to be used in larger areas. It’s mainly meant to be more of a spot treatment option for a tight space that might be showing early signs of rising damp.
Why They Work
These products are created to specifically be used in DIY applications. The packaging and formula are meant for home use. Here are a few of the considerations that makers of damp proofing creams have considered:
- Creams are easy and fairly quick.
- Advanced formulas that flow into areas but stay put once they’re in there.
- Safer formulas that don’t qualify as irritants (but still should be used with caution and kept away from children)
- Effective installation that fits into skeleton guns, resulting in less waste.
- Application with a skeleton gun allows less room for messes and spills.
- Works with drills that most homeowners already have.
What You’ll Need
Even though damp proofing creams are an easy form of DPC to install on your own, there are a few things you’ll need to have in order to make the DIY project a success. All of the tools and products listed will help with the ease of installation while making sure that the DPC is installed properly.
If you don’t already have these, you can either purchase them new or alternatively, try online marketplaces. These can be a great place for acquiring DIY project tools. Online marketplaces are full of things that have been used just a couple of times before someone decides they don’t want to store them anymore.
How to Use Damp Proofing Creams
- Secure any leaks or potential hazards that might impact your installation of a DPC. If you find or have any of these surrounding the area you’re working with, then be sure to make the necessary repairs before beginning the DPC installation project.
- Broken or leaking gutters that are draining toward the area being damp proofed
- Higher ground that causes water runoff that can saturate regions near the failed or lacking damp proofing
- Pipes that need repair or replacement that are in close proximity to possibly impact the effectiveness of DPC
It’s also important to make sure that the area has dried sufficiently, as well. Installing a DPC to a water-saturated area is counterproductive, to say the least.
- Mark the spots to be drilled in the brickwork or mortar, starting with the area affected by the moisture and extending at least six inches out. Space the holes about 4.5 inches apart.
- Use the 12 mm bit to drill holes in the brickwork, or mortar. Angle the drill down, making holes that are at least 5.5 inches into the ground.
- Put the damp proofing cream into the skeleton gun and attach the extension nozzle to the tube of the product.
- Press the nozzle firmly into the drilled holes, starting at the very base of the hole and continuing to fill while slowly pulling back on the skeleton gun. This ensures that the hole is being filled with the product while minimizing air space or possible bubbles.
- Wipe or scrape away any excess product. Seal each hole with mortar or one of the plastic plugs.
Why Damp Proofing is Necessary
We know what damp proofing is, and even how to do it at home. But why exactly is it such an important precaution to include in the building process, or to do on your own later down the road if you see fit? The following information will help answer those questions.
Rising Damp and Condensation
Let’s consider the different kinds of water than can travel from the outside, in. Water from ground moisture and even humid air can enter the home in two forms. One of these we’ve already mentioned: damp rising. The other is condensation. Condensation droplets can be just as dangerous as damp rising, so protecting against both of these is important.
The best way to keep damp rising from happening is a proper damp proof floor, along with walls. Damp proof walls are also the best line of defense against damage from extreme condensation.
Water Damage Prevention to the Structure of a Home or Building
Damp proofing is a major line of defense in preventing dampness from the ground from rising up and being pulled into the interior of a home or building. Whether it causes flooring to warp, carpet to mold, or any other damage to the building, the damage will cost you.
Often, rising dampness can cause enough damage that repairs will need to be made in order to maintain the overall building structure. An ineffective damp proof barrier can even cause damage to a wooden framework or roofing. These are costly repairs that have to be made.
Safety of Your Family or Coworkers
If there’s no damp proofing present or the existing damp proofing is failing, it can be hazardous to anyone in the space. Moisture and dampness that infiltrates a building can go unnoticed, often only detected once they’re seen or even smelled.
But, if you’re able to see or smell the dampness, it’s already producing dangerous mold. Mold isn’t only gross, but it can be hazardous to human health. This is especially true for anyone that has respiratory issues such as asthma or allergies.
Of course, health concerns are number one, making proper damp proofing very important to protecting the health and safety of those around us.
Protecting Possessions and Material Items
Whether we’re looking at home damp proofing or damp proofing in a small office space, there’s no doubt that you have some important items kept inside. Important documents, furniture, etc. are all left exposed to being damaged from dampness and moisture, if there’s not an existing barrier in place.
While flooding and leaking water fit into the category of water that would cause hydrostatic pressure, leading to damage, damp and moist air can also negatively impact furniture or interior finishings. Carpets, rugs, kitchen cabinets, and furniture can all be impacted by damp rising and condensation.
Wood Furniture and Finishings
Anything that’s made of wood inside the home is like a beacon for water and moisture. Also, most wood is treated to be somewhat water-resistant; there’s a certain level of maintenance that must be done to keep it from taking on any kind of moisture.
Unless you’re aware of exactly what kinds of wood you have in your home and keep a record of when it was stained or treated, it’s highly likely that they’re overdue for proper water-resistant treatment. That means that even dampness and moisture can permeate wooden surfaces, causing them to warp and even trap moisture inside.
Setting out the proper damp proofing measures is a good way to create the moisture barrier, without having to make sure you’re constantly maintaining anything that’s made of wood. Wood is another material that doesn’t show water damage until it’s too late when it’s becoming misshapen, or worse, developing an odor.
Fabric and Upholstery
Both of these materials are notorious moisture hoarders. Once dampness makes its way into the home, it’s already on its way to getting through to your textiles. Carpets, rugs, and upholstered furniture are all at risk for taking on dampness.
Moisture and dampness aren’t only going to change the way that upholstery and fabrics look by causing stains; it can also make them smell bad. Once this happens, the moisture is already trapped inside. Considering the measures you’ll need to take to air it out at this point, it will end up being more time and money than simply damp proofing to begin with.
The Verdict
If we consider all of the time and money that can be saved by including damp proofing in the building process, then yes, damp proofing is absolutely worth it. The amount of time and money that’s saved from having to repair water damage caused by damp rising or condensation is far more than the cost of damp proofing.
But what if your damp proofing fails, and you find yourself having to do some DIY repairs via damp proofing cream? Is damp proofing still worth it? Yes, even in this situation, the expense of damp proofing will pay off in the end.
As long as the damp proofing is preventative and doesn’t allow outside water to find its way in, then damp proofing is still saving your precious time and money, making it all worth it.
We also discussed how damp proofing can help keep mold and allergens from developing inside a home, which is a positive impact on the health of you and your family. Even if those in your home or workspace aren’t suffering from allergies or asthma, it’s still important to maintain clean air, and damp proofing is one way to help provide it.
Share this Post
Giovanni Valle is a licensed architect and LEED-accredited professional and is certified by the National Council of Architectural Registration Boards (NCARB). He is the author and managing editor of various digital publications, including BuilderSpace, Your Own Architect, and Interiors Place.