Affiliate Disclaimer: Some of the links below are affiliate links. As an Amazon Associate, I earn from qualifying purchases.
Whether it be a bathroom remodel, installing a sink, or any other home improvement/construction project, caulk serves as a fantastic sealant to aid you. However, caulk bubbles can ruin the overall aesthetic of your project and create technical problems. So why does caulk bubble, and how do you fix it?
Caulk tends to bubble because of improper use around wet areas where caulk is usually applied. To avoid this effect, make sure the area you are using the caulk is dry so that no moisture can create the bubbling effect that can ruin your project.
Now that you understand why your caulk bubbles, you might be asking, “How do I remove my old caulk and apply new caulk?” I’ll provide answers to that (plus, tips and recommendations) below. Keep reading to make sure your newly applied caulk doesn’t bubble up!
Removing Old Caulk
Removing your old caulk can be a tricky process, but the right tools can make all the difference. In order to prevent bubbly caulk, you need to remove the old stuff correctly. Here is a list of what you will need:
- Caulk Remover
- Needle Nose Pliers
- Five-in-One Tool/Toothbrush/Hook
- Bleach/Distilled Vinegar
- Sponge
- Gloves
These materials will make the task much easier for you to remove that old, bubbly caulk. Now that you have gathered these, here are the steps to remove it:
- Apply caulk remover to the existing caulk that you wish to remove.
- WAIT. The time you wait will depend on the caulk remover you buy, but most can take anywhere between 2 and 3 hours. So, after applying it, sit back and let it work its magic.
- Now take your needle nose pliers and remove the caulk. This step will remove most of the old caulk but expect some of the caulk to be left behind.
Note: Some more experienced and a steady hand will be able to use a razor blade to remove the caulk, but if you’re a beginner I suggest sticking to just the pliers. The razor blade, if you are not careful can cause damage.
- To remove the rest of the caulk, take your five-in-one tool and use the edge to scrape the remaining caulk from the area. For those of us who don’t just have a five-in-one tool just laying around, a toothbrush or hook will work just fine.
- Now that the caulk is gone, you will need to clean the area with a cleaning solution. Experts suggest using a solution made up of 1/3 bleach to every one gallon of water. You can also use distilled vinegar to remove mold and mildew.
- After applying this to the area, scrub it with a sponge, and rinse.
- WAIT (again). Give the area ample time to air dry. Doing this will ensure there is no moisture leftover and will help with those pesky bubbles.
If you are more of a visual learner, this video is excellent!
Choosing the Best Caulk
Now that you have successfully removed your caulk, you will have to replace it. There are so many different types of caulk from formulas to brands, making selecting caulk very difficult. Here is a list of the different types of caulk and the best brands to use:
- Silicone
Silicone is, maybe, the most popular and durable type of caulk anywhere. Silicone repels moisture, making it an excellent and long-lasting formula for your bathroom and sinks.
Gorilla Silicone Sealant – This caulk is perfect for any big jobs you might have. It is 100% silicone and is transparent. The formula makes it less suspectable to mold and mildew over time.
- Latex
The latex formula also can last a very long time– some even up to 15 years– but the more exposure it has to water, the more its lifespan shrinks, so keep it away from water. This caulk is excellent for crown molding and baseboards, as well as doors and windows.
Dap Painters All-Purpose – The acrylic latex formula, paintable with both latex and oil-based paints, makes this caulk perfect for filling window and doorframes.
- Expandable Foam
This type of caulk is perfect for big gaps and holes. Once you spray the foam, it will expand to fill any significant gaps or holes you have, making it ideal for electrical outlets or window jams.
Dap Tex Plus – This foam caulk has a water-resistant formula that can be painted over with latex paints. It is flexible when dry, making it perfect for cracks, gaps, and voids.
- Butyl-Rubber
Butyl rubber caulk is your caulk for all of those outside jobs you have. Gutters, roofing, you name it; if it’s outside, then this is the caulk for you.
Dap Drain Spouts – It’s durable, flexible, and watertight. Perfect for all those outdoor projects that on your to-do list.
*Warning: Only use this type of caulk outside. Clean-up can be very difficult, wear gloves to avoid getting it on your skin.
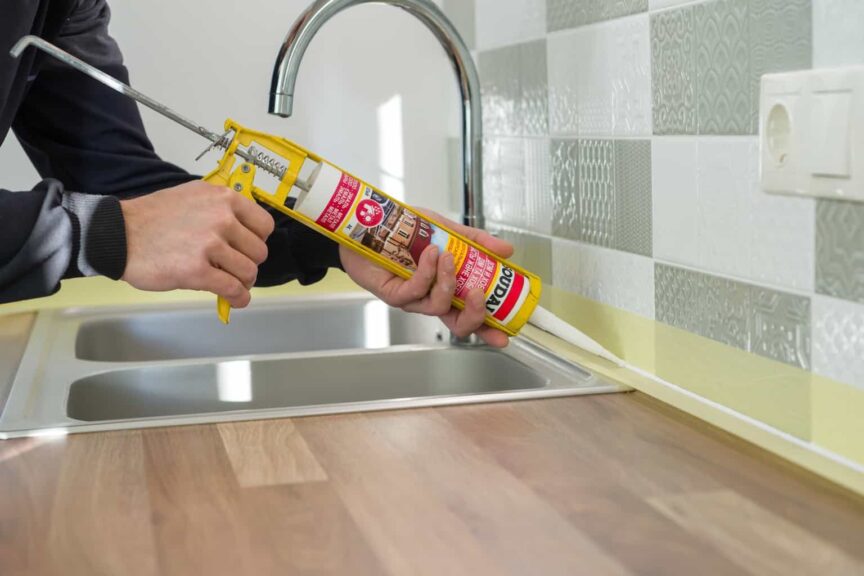
Applying New Caulk Like a Pro (No More Bubbles)
Now that you have gotten rid of that ugly caulk and picked out the perfect caulk for your project, you are probably wondering how you use the caulk you just bought. That’s why I will take you through a step-by-step on how to apply your new caulk to get professional results.
Materials:
- Caulk
- Caulk Gun
- Razor Blade
- Painters tape
- A tool to smooth or warm water
Step-by-step:
- Take your razor blade and slice the tip of your caulk, doing your best job to match the size of the hole with the size of the gap you wish to fill.
For the best results, cut the tip at an angle. Cutting the tip at an angle will give you ultimate control, as you already tend to hold the caulk gun at an angle. Also, avoid using the built-in blade on your caulk gun to cut the tip. Though convenient, this can affect your results.
- Load the caulk into your caulk gun.
For the best results, squeeze the trigger until you see the first bit of caulk come out. This step will ensure you caulk your whole line, so you don’t have to go back over it.
- Apply painter’s tape to the area you wish to caulk. The use of painter’s tape will give you cleanest lines.
- Caulk down your path and be as smooth as possible.
For the best results, make sure to stop moving when you can no longer pull the trigger, ensuring that there will be no gaps or clumps of caulk.
- Smooth the caulk out.
For the best results, there are tools for this specific thing, but after a few uses, these tools get scratched or nicked, making your caulk look sloppy. To avoid this, and for the most consistent results, you can dip your finger in warm water and go over it with your finger.
- Last but not least, when pulling away the painter’s tape be sure to bull the tape away from the joint and at a slight angle.
Again, for you visual learners, click this link to go to a video example.
More Tips to Avoid Bubbles in Your Caulk
Caulk can be tricky, but these tips can make the process easy and give you the results you are looking for.
- Use a Dripless Caulk Gun.
A dripless caulk gun will stop extra caulk coming out when you stop squeezing the trigger, giving you the ultimate control. With this tool bubbly caulk a thing of the past. Dripless caulk guns also won’t break the bank, as the only cost a few more dollars than regular caulk guns. They are more than worth the few extra dollars.
Newborn 930-GTD Drip-Free Smooth Hex Rod Cradle Caulking Gun is one of the best drip-free caulking guns on the market. It has a smooth pressure rod that makes for a flat and professional line.
- Move fast.
The faster you move, the less chance that it is for you to make a mistake. Fast doesn’t mean sloppy. Still, be very deliberate and smooth; just try to move as fast as possible to avoid bubbles and other common errors.
- Read the directions!
All caulk is a little different, so whichever caulk you go with, make sure to thoroughly read the directions on the bottle. This could be the difference between a job well done and an unsightly outcome.
Follow all these tips and tricks so the next time you notice bubbly caulk around your house you will be able to fix it like a pro.
Share this Post
Giovanni Valle is a licensed architect and LEED-accredited professional and is certified by the National Council of Architectural Registration Boards (NCARB). He is the author and managing editor of various digital publications, including BuilderSpace, Your Own Architect, and Interiors Place.